Showing posts with label ceramic beads. pottery beads. Show all posts

Tuesday, June 30, 2015

It's summer...pull out the canning jars.

I was raised in the country and we canned everything we couldn't eat fast enough.  There is even a family story of a near feud between two of my great aunts due to canning jars not being returned.  When I was a kid the jars often contained SWEET jam or SWEET pickles.  If the jars were empty we drank SWEET tea or SWEET lemonade out of the jars. In the spirit of summer time canning I have made these SWEET pottery cuff beads and I have included a quick tutorial on how to make a cuff bracelet faster than you can peel a bowl of peaches. 


In a mix of blues, browns and greens
In Indian Summer
 Super simple, just take a leather cuff and punch one hole to match up with each of the holes on the bead and then punch an additional hole approx. 1/4 inch from the outside of the first two holes.  I just hold the bead in the center of the leather and I use an ice pick to make a small prick in the leather where the hole will need to go.

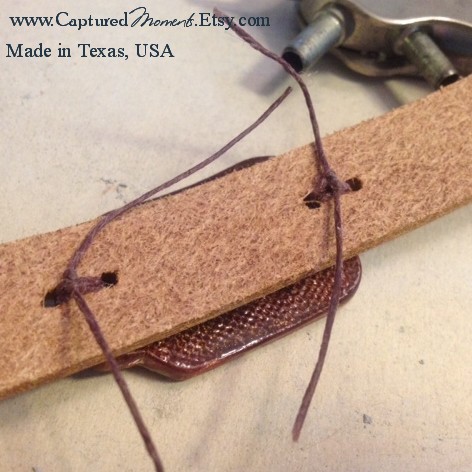
 Then I begin sewing the bead to the leather, I use waxed linen thread from the box chain craft stores (look where they sell leather).  After stitching thru the bead and leather a few times I tie it off in the back.

 Here are a few good shots of the knot in the back.  I find that the wax string stays tight and does not come undone.

Repeat with the other side and cut off the ends when you are done.  And faster than you can peel a bowl of peaches you have a SWEET cuff bracelet.  Enjoy!
 
I also wanted to share two beautiful designs using my cross beads.  The first is a Elli cuff bead made into a great bracelet by Southern Grace Jewelry and a beautiful necklace with one of my worldly mix cross pendants by Topa Topa DesignsEnjoy!


Thursday, August 8, 2013

Leather Cuff Using Recycled Upcycled Leather Tutorial

Free Tutorial, this is so easy you can make it today and wear it today. :)

Supplies: 

1. Find an old belt that doesn't fit anymore or one from a thrift store.  Cut off approx. 7 1/4 inches of the leather (for a large cuff-less if your wrist is smaller)Most belts will make 3-6 cuff bracelets or more depending on the size of the belt and the cuffs you make.
2.  Choose a great pottery focal bead.  I have several 100 to choose from I used the 30x60 mm cuff bead.
3.  Gather your leather punch, an ice pick would work also (just be careful).
 4.  Micro screws are used to cold connect (Cold connection refers to the process of joining together two pieces of metal without the use of heat) the pieces. I use a screwdriver to attach the screws like one you would use to repair eyeglasses.  The ends of the micro screws can easily be cut off if too long using wire cutters, and filed if needed with a household file to debur the edges.  I will often put a tiny drop of glue to make sure the screws do not loosen as the cuff is worn.
Stainless steel micro screws and nuts
 5. A pair of decorative ends in sterling silver plate.
These are reversable
Directions:

1. Cut the leather to size about 7 inches.
2. Hold the decorative end to the top end of the leather and mark where the screws will go.  Punch with leather punch.
3.  Attach decorative end using the micro screws and nuts.  Trim excess if needed with wire cutters.

One side attached to the decorative end
The back of the cuff

4.  Repeat with other side and attach a jump ring to one side and a lobster claw to the other side.
5.  Choose a cuff bead and mark the center placement on the leather using a pencil to indicate hole placement.  Make holes with leather punch and attach with micro screws and nuts thru the top of the bead, down into the leather, and finishing in the back with the nut.  Trim screw if necessary with wire cutters.  The screw should hold the bead to the leather but do not over tighten as you could break the bead. 

The back of the cuff before the screws were trimmed with wire cutters
 The finished bracelet, so cute and so easy.  How many will you make?

Leather cuff with pottery cowgirl bead
 I hope you enjoy creating with this free leather cuff and pottery bead tutorial.

Tuesday, March 26, 2013

New Bead Designs


I just received my April issue of Bead Trends (I know you love the magazine as much as I do...but don't worry if your is not in the mail box yet, mine came early!!! WHY YOU ASK?).  I have two designs featured in the April 2013 issue.  The first design is a necklace with matching earrings in my new half circle sweet daisy beads.  It was made with copper chain and Swarovski crystal bicone beads in topaz.
? 
Supplies:
Beads: 5 half circle golden brown pottery beads with daisy’s www.CapturedMoments.ETSY.com
qty 4 8mm Swarovski crystal bicone beads in topaz artbeads.com
Chain: 22 inches of copper chain www.CapturedMoments.ETSY.com
Jump rings: qty. 14 9mm copper jump rings www.CapturedMoments.ETSY.com
Lobster claw clasp: one 15mm www.CapturedMoments.ETSY.com
Head pins: qty. 4 2 inch copper head pins artbeads.com
Copper daisy beads: qty. 4 5mm copper daisy spacer beads. Artbeads.com
Ear wires: qty. 2 copper ear wires www.artbeads.com
 
Step by step instructions:
 

Earrings


1. Take one head pin and place one copper daisy spacer bead, then one topaz bicone bead; make a simple loop.  To make a simple loop use your chain nose pliers and bend the head pin to make a 90 degree angle above your bicone bead.  Then with the wire end facing towards you grip the end with the your round nose pliers and wrap the wire away from you by turning the round nose pliers to make a nice loop. Then wrap the wire around the bottom of the loop to secure.  Cut off any excess wire.  Repeat to make a total of 4 simple loops.  2 will be used with the earring and 2 with the necklace.


2. Cut 2 pieces of 3 inch copper chain.


3. Attach one piece of the 3 inch copper chain to one of the pottery beads with a jump ring, attach the other end of the chain to the other side of the bead.


4. Carefully open the bottom loop of the ear wire and attach the copper chain that is now attached to the pottery bead into the center point of the chain.  Add the topaz bead loop to the opening also.  Close the bottom loop of the ear wire and repeat to finish 2nd earring.


Necklace:


1. Cut two pieces of 7 ½ inches of copper chain.  Take 4 jump rings and attach a jump ring to each end of each piece of chain.


2. Attach one of the pottery daisy beads to one of the jump rings on the copper chain. 


3.  Attach the 2nd pottery daisy bead to the first with a jump ring, add another jump ring and then attach the last pottery daisy bead to the other beads.  You will have a total of 3 pottery beads and each will be spaced with 3 jump rings. I used a oval jump ring in the middle of the three jump rings for interest.


4.  Attach the remaining chain to the pottery daisy bead with a jump ring. 


5.  Add a topaz bicone bead to the center jump ring to the right and left of the center pottery bead.  See finished piece.


6. Add a lobster claw to one of the chain ends.


7. Enjoy!

I also have a bangle in the April 2013 Bead Trends Magazine (see page 46-47) it is made using one of my pottery heart beads.A simple design using copper wire from the electrical supply store.


Supplies:


Wire: 16 inches of 8 gauge copper wire, from the hardware store, electrical dept.
And 16 inches of 12 gauge wire
Bead: Pottery heart bead in Malachite Green from CapturedMoments.etsy.com

Step by Step Instructions:

1. Cut a 16 inch piece of 8 gauge copper wire and make a larger loop at one end this will be part of the clasp.

2. Thread pottery bead unto the 8 gauge wire.

3. Bend the wire around a bracelet mandrel, or an oval shaped object. I use the handle of an axe from the garage.  You want to then check the sizing and see if it would fit your wrist comfortably.  Cut off any excess wire leaving ¾ inch extra to make a simple hook for your bangle.  Carefully flatten the wire on the bangle using a bench block and hammer, make sure your bead is in place where you want it and flatten the wire around the bead being careful not to hit the bead.  It is helpful if the bead hole is large enough to slide the bead out of the way while shaping the copper wire.  Flatten the copper wire of the bangle to add detail. 

4. Shape a simple hook to the remaining end.

5. Take a 2 inch piece of 8 gauge wire and fashion an “S” curve or other shape to accent your bangle. Or any design that you like.

6. Flatten the copper “S” shape using a hammer and a metal bench block.

7. Attach the “S” shape to the bangle near the bead with the thinner wire.  Wrap with wire to secure and wrap on each side of the heart bead to secure the pottery bead from sliding on your bangle.

8. Wrap the loop closure with wire to secure.

9. If you have a torch or a gas oven you can carefully hold your finished piece to the heat for a few seconds to torch fire the copper, changing its colors.  If you see colors you like on the copper, stop the torch firing as you cannot bring your piece back to those colors.  The pottery bead will not be affected by a quick flicker of heat. 

I hope you enjoy the tutorials. 


Wednesday, September 5, 2012

A few ideas on how to use my cuff beads

There are probably a million ways to make a bracelet with my 30x60 mm cuff beads.  Yet I still get lots of questions on how to get started so I here is a quick tutorial. One way is to use cord, ribbon or leather and a square knot to macrame a bracelet.  To macrame you will need approx. 6 ft of cord or leather.  Most people have tied a square knot at one time or another and this is very easy once you try it.  I have taught girl scouts as young as 7 years old and they learned how to in about 15 minutes.  Hopefully the photos will help. First take your cord and cut it into 4 equal pieces.     

Then string the cord thru one of the holes on the bracelet, you want one side about 6 inches long and the other side about 18 inches long.

Repeat with the other side.

Now the short ends will be the middle of your macrame and they are going to do nothing.  The longer pieces do all the work, start by taking the right hand cord over the two middle cords,

and over the left hand cord.

Bring the left hand cord under the two middle cords and up thru the loop.  Tighten gently,


and repeat starting on the right hand side.  If you don't switch sides your cord will spiral and not lay flat.

Continue repeating until the macrame is long enough to complete one half of your bracelet.


You can tie a knot at the end and attach a button on one side and a loop on the other or use a leather crimping end cord to finish.

You could also wrap wire around the end tightly to finish making a loop in your wire wrapping to attach a jump ring. 
 Leather cord can be folded over and wire wrapped to secure.  A jump ring can be attached to the leather loop for attaching to the bracelet bead.
About 6 inches of wire, bend the edge down 1/8 inch to make a hook to start


It helps to hold the loop with a pair of needle nose pliers.
A finished loop on your leather, just add a jump ring now to attach
 Another way to use my cuff beads is just attach five 10mm jump rings or larger to the end and attach leather or chain to the bead. 

In this sample the leather cord loop was attached to the cuff beads with a jump ring.

A leather cord end is a more polished look and is easily done by taking the leather and dipping it in a tiny bit of E-6000 glue and then firmly pushing the leather end cap on the leather end to secure.  Be sure and allow to dry overnight before attaching your jump ring.

The end cap glued to the leather cord

A sample made with flat leather and one made with leather round cord, both of these pieces were finished by wire wrapping the end to secure.

The left side has a loop made with the wire to attach to the lobster claw on the right
I hope this helps, with sparking some ideas on how to get started using my cuff beads.  Please look at my website for 100's of cuff beads and lots of sample photos there also.  Enjoy! Cindy