Sunday, October 27, 2013

I love Olives

I have fond memories of the holidays when I was a young girl.  We would go to my grandparents house and there was always wonderful food to eat.  My favorite treat was the olives.  My Unkie Dan (his special name) was always helping the ladies in the kitchen, and he would let me put an olive on every finger.  How I loved those olives, I thought my granny must be rich to be able to always have olives for Christmas.  I can remember telling myself that when I grew up I wanted to be rich enough to always have olives in my refrigerator.  As an adult I have almost always had a jar of olives in my refrigerator as I still love those tasty green treats.  I made some super cute olive beads, they make me smile.  I hope you enjoy them too.


See past blog post for a tutorial on how to make this cuff

Here are some great designs made with my beads. The following three designs are made by Stephanie.  Stephanie has a great eye for design, she is a Tampa girl transplanted to New Jersey caught between lovin' the big city and wantin' to be a country girl. You can find Stephanie's shop at https://www.etsy.com/shop/SassyBelleWares


This was a special order bead that Stephanie had me design

Girls Raised In the South focal bead

A few more great designs using my pottery beads.  These designs were made by Lisa Casteel Morton she loves creating works of art with beads, chain and wire. She enjoys wearing pieces that she creates as well as making jewelry for friends and family. Her Etsy shop is https://www.etsy.com/shop/SouthernGraceJewelry

Lisa has a great quote on her profile at Etsy.

"The biggest myth about Southern women is that we are frail types-fainting on our sofas....Nobody where I grew up ever acted like that. We were about as fragile as coal trucks."
----Lee Smith 

The focal bead is in copper brown


Saturday, October 12, 2013

Edgy bracelet tutorial using a pottery cuff focal bead and a bicycle tire

If you have been following my blog you know I like to recycle or up cycle items.   This hole project began when I spotted a old bike I had as a child up against the barn of my childhood home.  My daddy helped me take the chain off the old bike and I used it to press into the wet clay to make this super cool edgy pattern.  Then another crazy idea was to use a recycled bicycle inter-tube as the cuff of the bracelet.  The inter-tube was rescued from a bike my kids have recently out grown. I took the old bike inter-tube and fashioned this cool, edgy bracelet.  It was super quick to make and a fun accessory especially for bike lovers. 

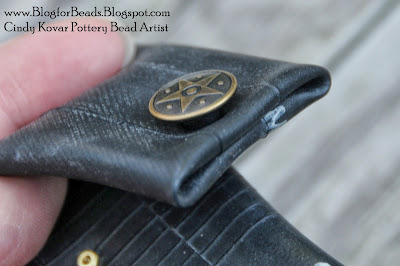
I started by cutting off approx. 9 inches of the inter-tube, I then folded about a half inch of the tube inside itself to form a more finished edge.  I punched a hole with my leather punch and attached a metal button like one finds on their bluejeans. See post for details.


I then cut a button hole on the opposite side and curved the ends of the inter-tube using household scissors.  I glued the ends shut with household white glue.  To hold in place while drying I put clothes pins on the end.  Sorry I forgot to photograph that step. After it had dried overnight, I removed the clothes pins.


I held a 30x60 mm pottery cuff bead up to the center of my bracelet and punched holes to match the hole placement in the bead.  I then attached the bead to the inter-tube using micro screws.


This is the finished bracelet, ready to wear.  It should be a fun piece to wear with jeans and perfect for a bike or motorcycle enthusiast.  This piece was made with a stormy blue pottery bead but I have it in rusty truck also which is a brown with red rust spots.  Enjoy! Cindy


Note: that bike tubes have a natural curved shape so if you use a focal bead that has a top and bottom design you may consider adjusting that with the curve of the tube.


Friday, October 4, 2013

A Recycled Boot is Now Leather Cuffs Accented with Pottery Beads

     My family has always recycled items since I was a child.  Only when I was a child, it was not called recycling and it wasn't necessarily cool like it is now.  I wore recycled clothes (hand me downs).  My mom and dad re-purposed items daily (old stuff used again).  Daddy bought scrap metal at the salvage yard and made everything you can imagine from bar-b-q pits to cattle pens.  Mama recycled old jars and filled them with delicious canned goods; and she would even save every last piece of pie crust when she made a pie and roll it out and fill it with cinnamon, sugar and pecans for a tasty treat for us kids.  If it could be used again it did not get thrown away.
     My husband just bought a new pair of work boots and I spied them before they made the trash and I recycled one of the boots into two leather cuff bracelets.  I still have one boot and have plans to use it soon.  Here is a quick tutorial on how hand me down boots became two new bracelets.

    First I cut the leather into 1 1/2 to 2 inch leather strips about 9 inches long.  I added a metal button (see previous post for how to).  On this bracelet I wanted to use the leather piece that you hook your fingers into when pulling on the boot.  I took a pony tail holder in a brown shade to use as part of the connector.


      Regular everyday pony band for hair
     I cut the band in half and threaded it into the loop of the boot for my connector.
      I tied a knot in the pony band and put some glue on it to secure it, then I hid the knot under the leather loop.
      Here is the start of my first cuff, the leather came from the part of the boot that was the side at one time. 
      I choose one of my 30x60mm cuff beads in Sea Green and I held it up against the leather and marked the holes to match the holes in the bead, then I punched additional holes just outside those that matched the bead.  Using a leather punch makes this really easy (see previous post for how to).
      I then used waxed linen thread, available at your local craft store and I sewed the bead on using simple stitches and knotted the thread on the back of the leather. Below is the finished product.  I think it turned out cute and edgy.


     For the second cuff I put two of the metal buttons on it and cut holes for the button hole (see previous post for how to).  I determined the center of the leather and placed a key hole bead to the middle and marked the hole placement and then punched holes using my leather punch tool.  Then punch a hole just outside of the holes that match the beads so you can sew your key hole bead on to the leather.  I used simple stitches with the thread and since the holes in the leather are large and the thread is waxed you do not need a needle as it goes in easily.
  
     Gather some old keys and punch holes on either side of the keys and sew on to the leather using waxed linen thread.

    This is the back and you can see the stitching where the bead and keys are.
 
 The finished cuff, I really love this one. I wore it yesterday and received lots of compliments.
 

      I hope you enjoy the tutorial, have a great day! Cindy